
Table of Contents
- Signs of Rodent Damage in Walls and Insulation
- Safety Preparation: Rodent Waste Cleanup Safety Protocols
- Step-by-Step Removal of Damaged Insulation
- How to Sanitize Attic After Rat Infestation
- Selecting and Installing New Insulation
- Sealing Entry Points to Prevent Return Infestation
- Disposal Regulations and Documentation
- When to Call Professionals vs. DIY
- Frequently Asked Questions
Last Updated: September 25, 2026
Signs of Rodent Damage in Walls and Insulation
Rodent damage extends beyond droppings, rats and mice tear apart insulation and leave contaminated materials that pose serious health risks, making it necessary to replace rodent damaged insulation. Recognizing the signs is the first step to solving the problem.
Look for these visual indicators in your attic spaces:
- Insulation matted down or compressed in clusters
- Visible nesting materials (shredded paper, fabric, plant fibers)
- Dark droppings scattered across surfaces and inside insulation
- Urine stains or discoloration on insulation batts
- Chewed or torn sections of fiberglass or cellulose
- Pungent odors that intensify near contaminated areas
- Visible rodent pathways or runways through insulation
Health hazards from contaminated materials include hantavirus, leptospirosis, and other pathogens in rodent fecal matter and urine. Inhaling dust from contaminated insulation can trigger respiratory problems, allergies, and serious infections, never clean with a regular vacuum.
Contaminated insulation requires professional handling because urine saturation penetrates deep into the material, making surface cleaning ineffective. Replacement is almost always necessary.
Never use a standard household vacuum to clean rodent-contaminated insulation. Regular vacuums spread airborne pathogens throughout your home and can damage the vacuum permanently. This is a biohazard cleanup situation.
Safety Preparation: Rodent Waste Cleanup Safety Protocols
Before touching contaminated insulation, you need proper protective equipment and workspace setup to handle this biohazard safely.
Essential protective equipment includes:
- N95 respirator (not just a dust mask, a fitted N95 or P100 respirator)
- Disposable coveralls to prevent skin contact and contamination spread
- Double nitrile gloves
- Eye protection or face shield
- Shoe covers or dedicated cleanup boots
- Headlamp or work light for visibility
The respirator is non-negotiable, airborne contaminants from fecal matter and urine are invisible and dangerous. A standard dust mask does not filter pathogens.
Workspace setup and containment isolates the contaminated area:
- Close doors and seal gaps with plastic sheeting
- Turn off HVAC systems to prevent air circulation through contaminated zones
- Lay plastic sheeting on the attic floor to contain debris
- Set up a disposal area outside for contaminated materials
- Spray contaminated areas lightly with disinfectant before disturbing them to reduce airborne particles
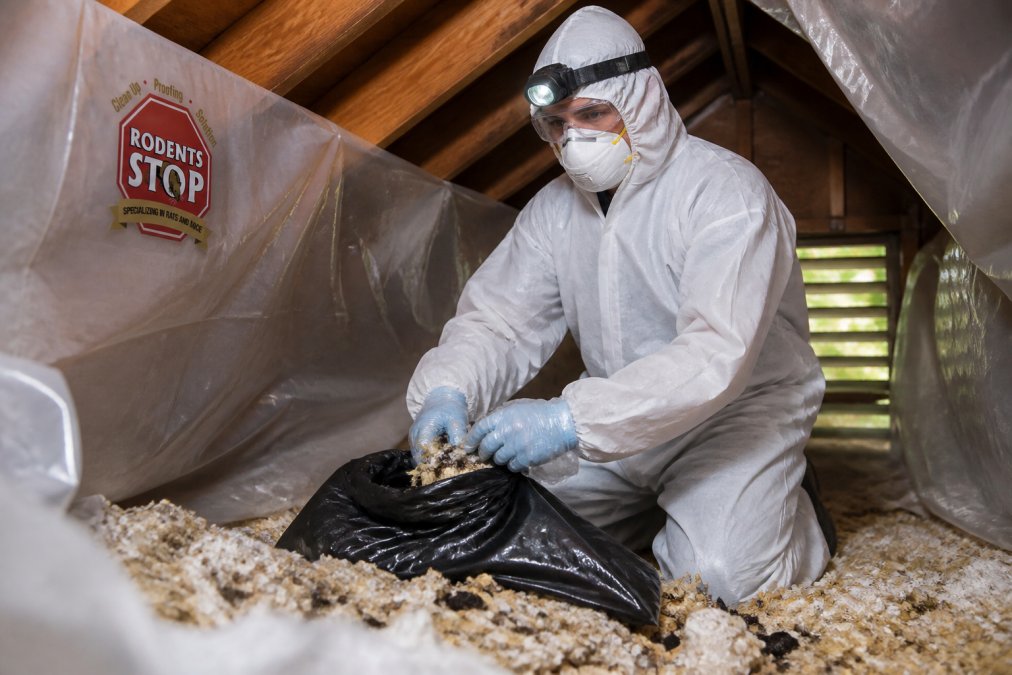
Spray contaminated insulation with a 10% bleach solution before removal. This kills pathogens and reduces the dust cloud when you handle the material. Wait a few minutes before touching it.
Step-by-Step Removal of Damaged Insulation
Assessing the extent of contamination: If more than 25% of your attic insulation is contaminated, full replacement is usually most cost-effective. Pathogens spread through insulation more than you can see, making spot-cleaning less effective.
Removal techniques for different insulation types:
Fiberglass batts: Remove entire sections between joists and place in heavy-duty garbage bags sealed immediately.
Blown-in insulation: Vacuum out contaminated sections using a HEPA vacuum or remove the top layer and replace it.
Foam board or rigid insulation: Remove entire panels, foam absorbs urine and odors deeply, making sanitization nearly impossible.
Cellulose insulation: Remove and replace, cellulose absorbs moisture and urine readily, embedding pathogens in fibers.
Place all contaminated material directly into heavy-duty bags. Do not leave it sitting in the attic or garage. Seal bags tightly and arrange for hazardous waste disposal according to local regulations.
The goal is complete removal of visibly contaminated insulation. Half-measures leave pathogens behind and odors return quickly.
How to Sanitize Attic After Rat Infestation
Deep cleaning and HEPA vacuuming are essential after insulation removal. Vacuum all surfaces, joists, and corners with a HEPA-filter vacuum, wipe wooden framing with disinfectant, and dispose of vacuum bags in sealed containers. HEPA vacuums capture 99.97% of particles 0.3 microns and larger, standard vacuums do not.
Odor and pheromone treatment addresses lingering smells. Rodent urine contains pheromones that attract new rodents, simply cleaning doesn’t eliminate these chemical markers. Use enzymatic cleaners that break down urine compounds, odor-neutralizing fog treatments, and proper ventilation.
Keep the attic well-ventilated for at least 2-3 weeks after sanitization. Open soffit and ridge vents, and if possible, run a portable HEPA air purifier in the attic space to accelerate pathogen clearance.
Selecting and Installing New Insulation
Once the attic is clean and sanitized, you’re ready to replace rodent damaged insulation with fresh material. But material choice matters more after a rodent infestation than in a standard retrofit. Some materials are more resistant to future damage and odor absorption than others.
Common options for attic insulation include:
-
Fiberglass batts: R-3.2 to R-3.8 per inch. Affordable, easy to install, standard choice. Rodent resistance: Moderate. Mice can shred batts, but the material doesn’t absorb urine as readily as cellulose. If re-infestation occurs, damage is visible and localized. Odor absorption: Low to moderate.
-
Blown-in cellulose: R-3.2 to R-3.6 per inch. Denser coverage, fills gaps well, good for irregular spaces. Rodent resistance: Lower. Cellulose is attractive to rodents for nesting material and absorbs urine deeply, making sanitization harder if re-infestation happens. Odor absorption: High, urine odors linger longer in cellulose than other materials.
-
Blown-in fiberglass: R-2.2 to R-2.7 per inch. Lighter than cellulose, good for open attics. Rodent resistance: Moderate to good. Less attractive for nesting than cellulose, and urine doesn’t saturate as deeply. Odor absorption: Low.
-
Spray foam (closed-cell): R-6 to R-7 per inch. Most expensive, best air sealing, excellent rodent resistance because it’s difficult to nest in and doesn’t absorb urine. Odor absorption: Minimal. Downside: overkill for most attics and requires professional installation.
Check local building codes for minimum requirements.
- Maintain proper ventilation between roof and insulation (soffit vents to ridge vents), this discourages rodent nesting by increasing air movement
- Don’t compress insulation, it reduces R-value and can create gaps where rodents hide
- Cover all attic joists and corners evenly; gaps are entry points for nesting
- Leave clearance around light fixtures and exhaust vents (at least 3 inches)
- Seal air leaks before insulating (gaps around pipes, ducts, and wiring), rodents follow air currents into attics
- Install a vapor barrier if your climate requires it; this also prevents moisture that attracts rodents
- If using batts, ensure they’re fitted snugly between joists with no gaps; loose batts create voids
After rodent damage, material choice is a long-term investment in prevention. Fiberglass and blown-in fiberglass are better choices than cellulose if re-infestation risk is a concern. Proper installation with no gaps or voids is equally important as material selection.
Sealing Entry Points to Prevent Return Infestation
Removing and replacing insulation means nothing if rodents can walk back in. Entry point sealing is how you keep them out.
Identifying common rodent entry points requires careful inspection:
- Gaps around utility penetrations (pipes, wires, ducts entering the house)
- Holes in soffit or fascia boards
- Cracks in foundation or rim joist
- Gaps between siding and trim
- Openings around roof vents or chimney flashing
- Damaged window or door screens
- Gaps under doors or around garage doors
Exclusion techniques and materials seal these gaps permanently:
- Steel mesh or hardware cloth: Cut to size and secure over openings. Rodents can’t chew through steel.
- Caulk or sealant: For small gaps in wood or concrete. Use silicone or polyurethane caulk, not latex.
- Expanding foam: For larger gaps. Trim excess foam and cover with caulk or metal mesh (rodents chew through foam).
- Door sweeps: Install on exterior doors to close gaps at the bottom.
- Vent covers: Install rodent-proof covers on dryer vents, bathroom vents, and foundation vents.
Sealing entry points without removing rodents first traps them inside. Always confirm the infestation is gone (no droppings, no sounds, no odors for 2+ weeks) before sealing.
Disposal Regulations and Documentation
Contaminated insulation is hazardous waste in most jurisdictions. Proper disposal protects your health and follows local regulations.
Keep documentation of the cleanup process:
- Photos of contamination before removal
- Records of materials removed and disposal method
- Receipts for protective equipment and cleaning supplies
- Notes on dates and scope of work
When to Call Professionals vs. DIY
Small infestations with limited insulation damage might be manageable as a DIY project if you’re comfortable with hazardous material handling. Larger infestations, widespread contamination, or structural concerns warrant professional help.
Call professionals when:
- More than 25% of attic insulation is contaminated
- You find rodent damage in walls or crawl spaces (harder to access and treat)
- Odor persists after cleaning (indicates deep saturation)
- You have health concerns or respiratory sensitivity
- You’re uncertain about entry points or exclusion techniques
- You want documentation for insurance or liability purposes
Frequently Asked Questions
Is it safe to leave rodent-damaged insulation in my attic?
No. Rodent-contaminated insulation poses serious health risks. Rodent fecal matter and urine contain pathogens including hantavirus, which can cause severe respiratory illness when airborne contaminants are inhaled. Contaminated insulation also loses thermal efficiency and creates structural damage over time. Removal and replacement is essential for both health and home integrity.
How do I know if my insulation is contaminated by rodents?
Look for visible droppings, nesting materials, urine staining (dark spots or discoloration), and a strong ammonia-like odor. Insulation may appear matted or compressed where rodents have nested. If you find any of these signs of rodent damage in walls or attic spaces, the insulation is likely contaminated and should be removed and replaced professionally or with proper safety precautions.
What are the main health risks of rodent-damaged insulation?
Contaminated insulation exposes you to hantavirus, leptospirosis, and other pathogens carried in rodent waste. When you disturb infested insulation, airborne particles containing fecal matter and urine can be inhaled, causing respiratory infections, fever, and serious illness. Children, elderly individuals, and those with compromised immune systems face heightened risk. Professional remediation using proper rodent waste cleanup safety protocols minimizes exposure.
Does homeowners insurance typically cover rodent damage to insulation?
Most standard homeowners insurance policies do not cover rodent damage, as infestations are considered preventable through maintenance. However, some policies may cover secondary damage like structural harm or water damage resulting from rodent activity. Review your specific policy or contact your insurance agent. Keep documentation of the infestation and cleanup for potential claims or future coverage discussions.