Table of Contents
- Understanding Rodent Damage and When to Call Professionals
- Signs of Rodent Damage in Walls and Hidden Spaces
- Rodent Damage Electrical Wiring Repair
- Rodent Entry Point Sealing Techniques
- Professional Cleanup and Sanitation After Rodent Infestation
- DIY vs. Professional Rodent Damage Repair
- Long-Term Prevention and Maintenance
- Frequently Asked Questions
Last Updated: October 3, 2026
Understanding Rodent Damage and When to Call Professionals
Rodent damage repair goes far beyond removing droppings and nesting materials. When rats or mice invade your home, they leave behind contamination, structural damage, electrical hazards, and health risks that compound over time. At Rodent Cleanup Experts, we’ve seen infestations destroy insulation, chew through wire harnesses, contaminate HVAC systems, and create fire hazards that homeowners didn’t even know existed until the damage was extensive.
The challenge most homeowners face is recognizing when rodent damage requires professional intervention versus what can be handled independently. A small nest in the garage might seem manageable, but rodent infestation often extends into walls, attic spaces, and crawl spaces where the real structural and electrical damage accumulates. Understanding the scope of damage determines whether you’re looking at a weekend cleanup or a comprehensive restoration project.
Signs of Rodent Damage in Walls and Hidden Spaces
Visual indicators and structural assessment
Identifying rodent damage early prevents escalation. Look for droppings concentrated in corners, along baseboards, and inside cabinets, fresh droppings appear dark and moist, while older ones are gray and brittle.
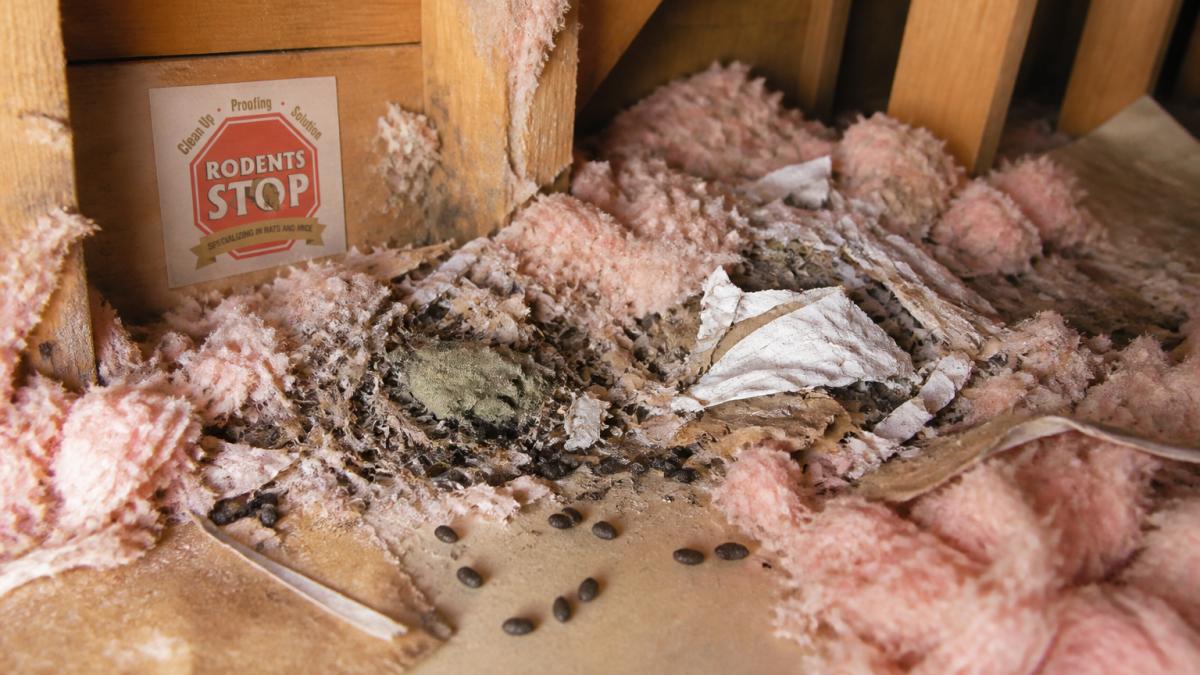
Structural damage appears as gnawed wood framing, compromised drywall, and damaged vapor barriers. In engine bays and crawl spaces, look for shredded wire insulation and damaged loom tape that exposes copper conductors.
Odor is often the first sign homeowners notice. A musty, ammonia-like smell indicates urine contamination in walls and insulation. This smell intensifies in warm weather when urine compounds volatilize.
Check attic spaces during daylight hours using a flashlight. Look along rafters, pipe penetrations, and where utilities enter the attic, rodents concentrate nesting materials near entry points. Photograph any damage for documentation and insurance purposes.
Health and safety concerns
Rodent droppings carry hantavirus, leptospirosis, and salmonella. Direct contact with droppings or inhalation of dust from dried droppings poses serious health risks, particularly for children and immunocompromised individuals. Contaminated insulation becomes a health hazard that standard household cleaning cannot address safely.
Electrical damage creates fire hazards. When rodents chew through wire harnesses and heat shrink tubing, exposed conductors can arc against metal framing or create short circuits. Damaged wiring in walls may not show signs immediately but can cause fires months after the initial rodent damage occurs. A multimeter continuity test reveals breaks in wire insulation before they become dangerous.
Rodent Damage Electrical Wiring Repair
Diagnosing electrical damage
Start with a visual inspection under bright light. Look for chewed insulation on visible wiring, particularly in engine bays, crawl spaces, and attic areas where rodents concentrate. Check for scorch marks on wire jackets or surrounding materials, these indicate arcing from exposed conductors.
Use a multimeter to test continuity along damaged wire runs. Set the meter to continuity mode and touch probes to each end of the wire section. A continuous tone indicates the wire is still intact despite cosmetic damage.
Diagnostic trouble codes from your vehicle’s onboard computer can indicate electrical shorts caused by rodent damage. A check engine light appearing after rodent activity warrants electrical inspection. Engine bay wiring is particularly vulnerable because rodents are attracted to the warmth and the soy-based wiring insulation used in modern vehicles.
Never attempt to splice or repair vehicle wiring if you’re unsure about gauge wire sizing or proper soldering technique. Improper repairs create intermittent electrical faults that are difficult to diagnose and dangerous. Professional electrical repair ensures safety and prevents secondary damage.
Repair methods and materials
Small sections of damaged insulation can be repaired using heat shrink tubing. Cut out the damaged section, strip back insulation carefully, and slide heat shrink tubing over the repair area.
For broken conductors or extensive damage, splicing is necessary. Strip insulation from both wire ends, twist the strands together, and solder the joint using rosin-core solder. Wrap the joint with loom tape or amalgamating tape to restore insulation.
Extensive damage to wire harnesses often requires complete replacement. In vehicles and equipment, this means removing the damaged harness and installing a new one. For home electrical systems, damaged circuits should be replaced by a licensed electrician.
Prevention after repair is critical. Once wiring is restored, seal entry points and apply deterrents to prevent future rodent access.
Rodent Entry Point Sealing Techniques
Locating entry points
Rodents enter through openings as small as a dime. Inspect the exterior foundation for cracks wider than one-quarter inch. Check where utilities enter the home, water pipes, electrical conduits, and gas lines often have gaps around them. Look at roof penetrations, soffit vents, and chimney bases for damage or openings.
Inside, trace rodent pathways by looking for dark rub marks along walls and baseboards. These marks indicate frequent travel routes. Follow these trails to find entry points in walls, under cabinets, or behind appliances.
An under-hood inspection in vehicles reveals entry points into engine compartments and cabin spaces. Look for chewed weatherstripping, damaged rubber seals around doors, and gaps where wiring enters the cabin. Rodent-proof your vehicle by sealing these gaps before infestation becomes established.
Materials and sealing methods
Steel wool combined with caulk creates an effective barrier. Pack steel wool into gaps, then apply caulk over it. Rodents cannot chew through steel wool, and the caulk prevents them from moving it aside.
For larger gaps, use hardware cloth or metal mesh. Cut the material to fit the opening, secure it with screws or staples, then seal edges with caulk.
Foam sealant expands to fill irregular gaps but must be covered with metal flashing or caulk, rodents chew through foam easily. Use foam sealant as a base layer, then cover with a rodent-proof material.
Apply materials during dry weather when surfaces are clean and dry. Inspect sealed areas monthly for damage or new gaps. Rodents test barriers persistently, so regular maintenance is essential for long-term rodent-proof protection.
The most effective entry point sealing combines steel wool and caulk for small gaps, hardware cloth for larger openings, and regular inspection for new damage. This layered approach prevents rodents from finding alternative routes.
Professional Cleanup and Sanitation After Rodent Infestation
What professional cleanup includes
Professional rodent infestation cleanup removes contaminated materials safely using HEPA vacuuming equipment. Standard household vacuums release particles back into the air, spreading contaminants.
Contaminated insulation removal is a core service. Rodent-infested insulation cannot be salvaged, it must be removed entirely and replaced with new material. This includes removal of nesting materials, droppings, and urine-saturated fibers.
Deep cleaning and sanitizing of affected surfaces kills bacteria and viruses left behind. Professional teams apply hospital-grade disinfectants to walls, framing, and ductwork. This step eliminates pathogens that basic cleaning misses.
Pheromone treatment removes rodent scent markers that attract new rodents to the same locations. Rodents follow pheromone trails left by previous occupants, so removing these chemical signals is essential for preventing reinfestations.
Odor removal and contamination control
Odor removal requires more than air fresheners or surface cleaning. Rodent urine soaks into insulation, drywall, and framing, creating persistent odors that return in warm weather.
Activated charcoal and specialized deodorizers absorb odor molecules rather than masking them. These treatments are applied to contaminated areas and allowed to work over several days. Ventilation and air circulation support the deodorization process.
Contaminated drywall sections may require replacement if odor persists after treatment. Surface-level deodorizing cannot address odor that has penetrated deep into materials. Professional assessment determines whether treatment is sufficient or replacement is necessary.
Attic ventilation improvements prevent odor and moisture buildup that attracts future rodent activity. Proper ventilation removes moisture that supports mold growth and creates conditions rodents prefer. This preventative step reduces the likelihood of reinfestation after professional cleanup.
DIY vs. Professional Rodent Damage Repair
When DIY cleanup falls short
Attempting cleanup with a standard household vacuum spreads contaminants throughout your home. Rodent droppings contain hantavirus particles that become airborne when disturbed. Inhaling contaminated dust causes serious illness.
Identifying all contaminated areas requires experience. Rodents access spaces homeowners cannot easily reach, inside walls, above drop ceilings, and deep within crawl spaces. Missing contaminated areas means the infestation source remains, leading to odor persistence and potential reinfestation.
Wire harness damage assessment requires electrical knowledge. A homeowner might overlook subtle damage that creates intermittent electrical faults. These faults develop into dangerous shorts weeks or months after the initial inspection.
Sealing entry points without professional guidance often leaves gaps rodents exploit. Homeowners frequently seal visible entry points but miss secondary routes rodents use. Professional inspection identifies all entry points and ensures comprehensive sealing that prevents reinfestation.
DIY insulation removal in attics exposes you to hantavirus, mold spores, and fiberglass irritation simultaneously. Professional teams wear protective equipment and follow contamination control protocols. The health risk of DIY cleanup exceeds any cost savings.
Health risks and long-term costs
Incomplete cleanup leads to persistent odors and reinfestation. Rodents return to areas where pheromone markers remain, and incomplete sealing leaves entry points open.
Unaddressed electrical damage creates fire risk that increases insurance liability. If a fire occurs in wiring damaged by rodents, insurance may deny claims if damage was known and not professionally repaired.
Contaminated insulation reduces HVAC efficiency, increasing utility costs. New insulation installed during professional cleanup restores thermal performance. The energy savings over time offset a portion of professional cleanup costs.
Health complications from exposure to rodent pathogens create medical costs that dwarf cleanup expenses. Hantavirus infection requires hospitalization and intensive care. Prevention through professional cleanup is far more cost-effective than treating serious illness.
At Rodent Cleanup Experts, we assess damage comprehensively and provide detailed estimates before work begins.
Long-Term Prevention and Maintenance
Rodent prevention requires ongoing attention. Inspect your property quarterly for new entry points, particularly after seasonal weather changes.
Remove food sources and shelter. Store food in sealed containers, clean up spills immediately, and eliminate standing water.
Maintain HVAC systems and ductwork. Rodents damage ducts and contaminate air returns. Annual HVAC inspection catches damage early.
Monitor for early signs of activity. Fresh droppings, new gnaw marks, or musty odors indicate new rodent activity. Early intervention prevents infestations from becoming extensive.
Document all prevention efforts and professional services. Keep receipts for sealing work, insulation replacement, and electrical repairs.
Rodent damage extends far beyond visible droppings, it threatens your home’s electrical safety, insulation efficiency, and family health. Professional assessment identifies damage you might miss and prevents costly secondary problems.
Frequently Asked Questions
What are the most common signs of rodent damage in walls?
Look for chewed insulation, droppings concentrated in corners or along baseboards, and a strong musty odor. Rodents often leave greasy rub marks along walls where they travel repeatedly. You may also notice small entry holes about the size of a dime or larger, damaged electrical wiring, or structural holes in drywall. If you hear scratching sounds at night or see nesting materials like shredded paper or fabric, rodent activity is likely present in your walls.
Can rodent damage to electrical wiring cause a fire hazard?
Yes. When rodents chew through wire insulation, they expose live conductors that can create electrical shorts, arcing, and heat buildup. Damaged wiring may not trigger a circuit breaker immediately, allowing heat to accumulate in walls or attic spaces. This can ignite nearby insulation, wood framing, or nesting materials. Any sign of chewed wiring should be inspected by a qualified electrician immediately. Soy-based wire insulation, common in newer vehicles and some home wiring, is particularly attractive to rodents and degrades faster when chewed.
What materials work best for sealing rodent entry points?
Steel mesh, hardware cloth (1/4-inch or smaller), and metal flashing are most effective because rodents cannot chew through them. Caulk alone is insufficient, rodents can tear through it. Combine hardware cloth with expanding foam sealant for gaps larger than 1/4 inch, then trim excess foam and cover with metal mesh or flashing. Loom tape and amalgamating tape can reinforce sealed areas. Avoid using only plastic, rubber, or foam; these materials provide temporary protection at best and will be chewed through within weeks.
How long does professional rodent damage cleanup and restoration take?
Timeline depends on infestation severity and scope. Small, localized cleanups may take one to two days. Extensive attic or crawl space contamination requiring insulation removal, HEPA vacuuming, and sanitization typically requires three to five days. Odor treatment and structural repairs can extend the process. A professional inspection will identify the full extent of damage and provide a realistic timeline. Most homeowners can re-enter treated areas within 24 hours of completion, though some odor treatments require additional ventilation time.