Table of Contents
- What You’ll Need Before You Start Inspecting
- Audible and Visual Signs of Rodent Damage in Walls
- Rodent Electrical Wire Damage in Walls: What to Look For
- Mice vs. Rats: Reading the Difference Inside Your Walls
- How to Inspect Wall Insulation for Rodent Contamination
- Health Risks From Rodent Damage in Walls
- Professional Rodent Damage Restoration and Post-Infestation Sanitation
- Conclusion
What You’ll Need Before You Start Inspecting
Signs of rodent damage in walls are rarely obvious at first glance, which is why many homeowners miss early warning signals until the problem grows significantly. At Rodent Cleanup Experts, we’ve helped homeowners across Southern California identify and address hidden infestations.
Before inspecting, gather a bright flashlight or headlamp, nitrile gloves, an N95 respirator mask, a notepad, and ideally a stud finder. Rodents travel inside wall voids between studs, and knowing the framing layout helps you locate entry points more accurately.
Follow these ground rules:
- Never handle droppings, nesting materials, or dead rodents without gloves and a mask
- Do not use a regular household vacuum on droppings; it disperses pathogens into the air
- Document every sign with photos before disturbing anything
- If you suspect a large infestation, stop and call a professional
This initial inspection confirms whether rodent damage is present, assesses its scope, and identifies where to focus professional attention.
Audible and Visual Signs of Rodent Damage in Walls
The most reliable early indicators are detected before you ever see a dropping.
Scratching, Scurrying, and Gnawing Sounds
Rodents are nocturnal and most active between dusk and a few hours before dawn. Scratching noises are light and rapid, often concentrated in one area. Scurrying sounds move across ceilings or baseboards, suggesting travel between nesting sites and food sources. Gnawing sounds are slower and rhythmic, rodents chew continuously to wear down their ever-growing incisors, targeting electrical wiring, insulation, and drywall.
A common mistake is dismissing these sounds as "the house settling." Structural settling doesn’t move. If a sound tracks horizontally across a ceiling joist or repeats at the same time each night, that’s nocturnal activity.
Press your ear against drywall in different locations during quiet evening hours. The sound will be noticeably louder directly over an active wall void. Mark those spots with painter’s tape for an inspector to prioritize.
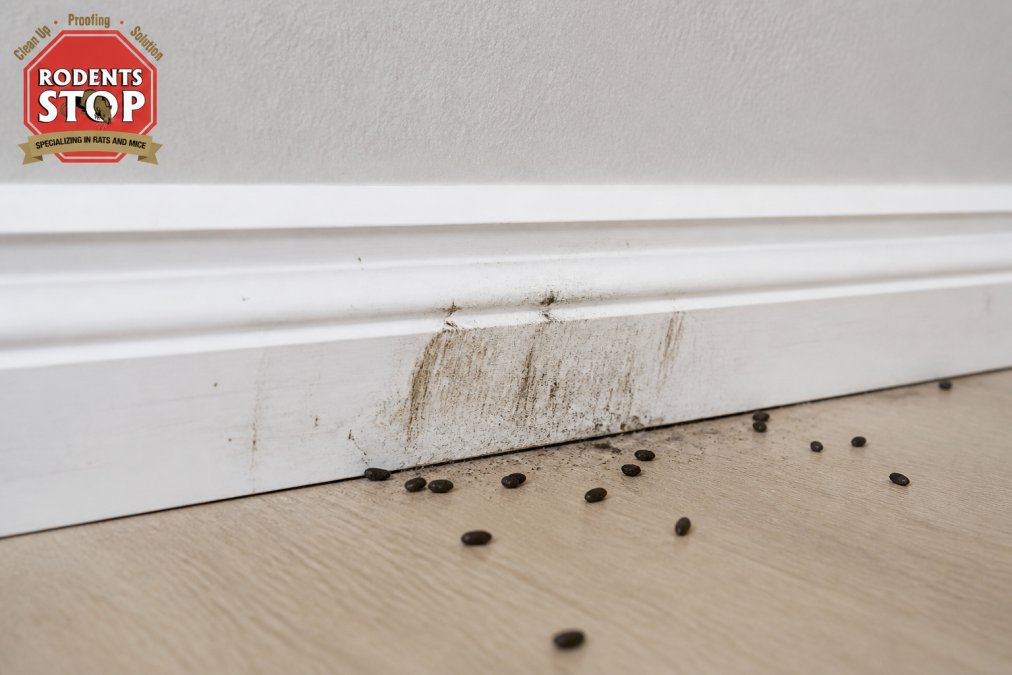
Droppings, Grease Marks, and Rub Marks
Visual evidence clusters near entry points, along baseboards, and behind appliances against exterior walls.
Fecal pellets are the most common sign. Mouse droppings are roughly 3-6mm long with pointed ends; rat droppings are 12-20mm and capsule-shaped. Fresh droppings are dark and moist; older droppings are dry, gray, and crumble easily. The quantity and distribution indicate how long the infestation has been active.
Grease marks and rub marks appear where rodents repeatedly travel. Rodents have oily fur that transfers onto surfaces they brush against. Look for dark, greasy smudges along baseboards, at the base of walls near pipe penetrations, and around gaps larger than a dime. These pheromone trails also serve as navigation signals for other rodents.
Urine stains are often invisible but fluoresce under a UV blacklight. Run a UV flashlight along baseboards and around the base of your water heater. Active trails will glow.
Never [clean rodent droppings or urine](/best-way-to-clean-rat-urine/) with a dry cloth or regular vacuum. Disturbing dried droppings can release hantavirus particles into the air. Dampen the area first with a disinfectant solution, then wipe carefully, or let a professional handle it entirely.
Rodent Electrical Wire Damage in Walls: What to Look For
Rodent electrical wire damage in walls is one of the most serious consequences of a wall infestation. Stripped or partially chewed wiring creates arc fault conditions, a leading cause of residential fires. According to the U.S. Fire Administration’s residential fire statistics, rodents are implicated in a meaningful share of fires where the cause is listed as electrical malfunction with no other explanation.
Signs that suggest rodent electrical wire damage include:
- Unexplained circuit breaker trips with no obvious cause
- Flickering lights in one area, particularly on exterior walls
- Burning or plastic smell near outlets or switch plates
- Non-functional outlets that worked previously
- Visible chew marks on visible wiring in the attic, crawl space, or garage
If you find any of these signs alongside evidence of rodent activity, treat the situation as urgent. Partial chewing can create intermittent faults that only trigger under load.
An electrician should inspect any wall cavity showing confirmed rodent activity before that cavity is closed up during restoration.
If you’re having a rodent cleanup performed, ask the technician to flag any areas where chewing on wiring or HVAC components was observed during insulation removal. That documentation is useful for your electrician and your insurance claim.
Mice vs. Rats: Reading the Difference Inside Your Walls
The distinction matters because mice and rats behave differently, travel differently, and require different exclusion strategies.
Mice are lightweight and agile, entering through gaps as small as a dime. They nest close to food sources, often inside wall cavities near kitchens. Their droppings are small and scattered widely, reflecting constant foraging throughout the night.
Rats are heavier and need larger entry points, typically the size of a quarter or larger. They burrow along foundations and travel established routes, producing more pronounced rub marks than mice. Rat activity in wall voids is louder and produces heavier thudding sounds compared to light scurrying.
| Sign | Mouse | Rat |
|---|---|---|
| Dropping size | 3-6mm, pointed ends | 12-20mm, capsule-shaped |
| Entry point size | Dime-sized or smaller | Quarter-sized or larger |
| Sound profile | Light scurrying, rapid | Heavier movement, thudding |
| Rub marks | Light, faint smudges | Dark, pronounced grease marks |
| Nesting location | Inside walls near food | Burrows, wall bases, crawl spaces |
| Primary damage | Insulation, small wiring | Structural chewing, larger wiring |
Misidentifying the species leads to failed exclusion. A patch that stops mice won’t stop rats. If droppings and rub marks suggest rats, the entry point assessment must account for foundation gaps, utility penetrations, and roof line access points.
How to Inspect Wall Insulation for Rodent Contamination
Contaminated insulation is one of the most significant long-term consequences of rodent damage in walls. Rodents nest inside insulation, compress it, saturate it with urine, and leave behind droppings and pheromone trails that attract new infestations even after the original animals are gone.
Using Thermal Imaging and Acoustic Detection
A thermal imaging camera can reveal temperature differentials inside walls that indicate compressed or missing insulation where nesting has occurred. Areas where rodents have displaced insulation show as cold spots in winter or warm spots in summer. This pre-inspection tool lets you target your invasive checks rather than cutting open walls at random.
Acoustic detection works similarly. Tap along the drywall surface with your knuckles. A solid, dense sound indicates intact insulation. A hollow sound suggests the insulation has been compressed, removed, or contaminated by nesting activity. Mark hollow sections for follow-up.
Structural Vulnerability Assessment: Entry Points and Wall Voids
A structural vulnerability assessment determines whether you’re dealing with a one-time event or an ongoing infestation cycle. Rodents don’t appear inside wall voids by accident. Until the entry gap is sealed, the problem will return regardless of cleanup thoroughness.
Common entry points include:
- Utility penetrations: Pipe and conduit entries through exterior walls are rarely sealed tightly
- Foundation cracks and weep holes: Rats frequently enter through foundation-level gaps
- Roof line and soffit gaps: Roof rats access homes through gaps at the roofline and uncapped vents
- Garage door seals: Worn or missing door sweeps are frequently overlooked entry points
- HVAC penetrations: Where ductwork exits through exterior walls, gaps are common
Walk the exterior perimeter at dusk with a flashlight and look for any gap larger than a quarter inch at ground level and any gap at the roofline showing daylight or staining. Document every one.
Sealing entry points without first removing nesting materials and treating pheromone trails is why infestations recur. New rodents follow scent trails left by previous ones and will find another way in if the chemical signal remains.
Health Risks From Rodent Damage in Walls
Rodent damage in walls is a public health concern extending well beyond structural problems. Primary pathogens include hantavirus, leptospirosis, and salmonella. Hantavirus is transmitted through contact with or inhalation of contaminated rodent droppings, urine, or nesting materials, direct contact with a live rodent is not required. Dried droppings disturbed during cleaning or construction can release viral particles into the air, which is why respiratory protection is essential during any inspection or cleanup.
According to CDC guidance on hantavirus prevention, risk is particularly elevated in enclosed spaces with poor ventilation, such as wall cavities, attics, and crawl spaces.
Rodent contamination also creates allergen exposure affecting respiratory health over time. Rodent urine proteins are potent allergens, and contaminated insulation continues to off-gas those allergens into living spaces through drywall gaps and HVAC returns.
Pets are also at risk. Dogs and cats investigating rodent activity areas can be exposed to secondary poisoning if rodenticide was used, and they can carry contaminated material on their fur into living areas.
Professional Rodent Damage Restoration and Post-Infestation Sanitation
Post-infestation sanitation is where most DIY efforts fall short and determines whether the problem is truly resolved or just temporarily suppressed.
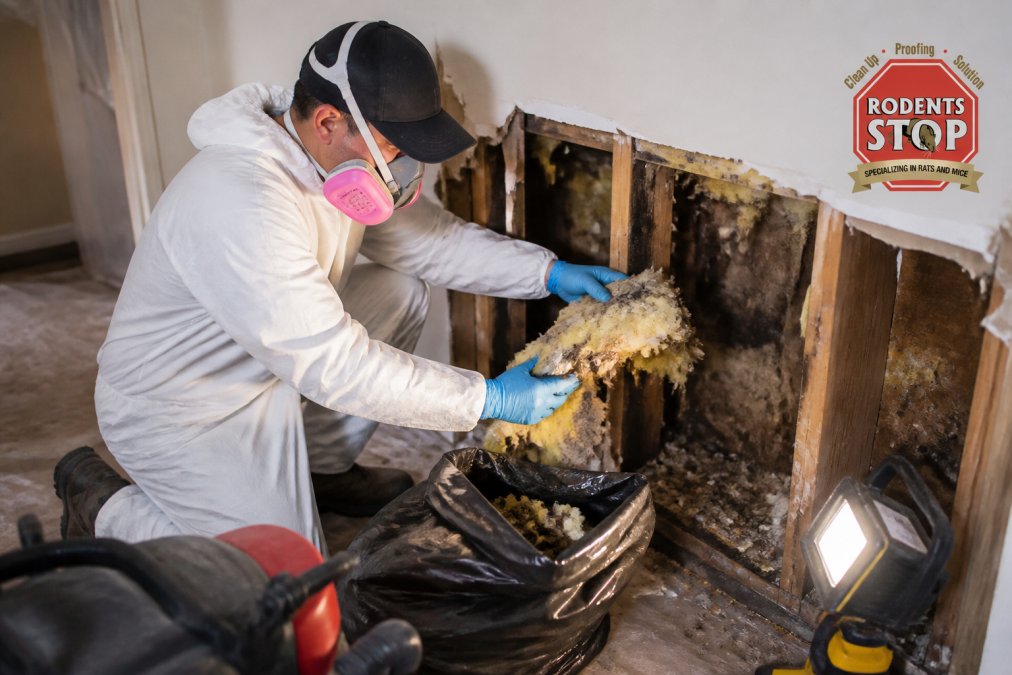
Rodent Cleanup Experts provides comprehensive rodent damage restoration beyond surface cleaning. Professional restoration typically involves removal of droppings and nesting materials, HEPA vacuuming of contaminated surfaces, deep cleaning and disinfection of affected wall cavities, odor and pheromone treatment to neutralize chemical signals, and replacement of contaminated insulation where necessary.
The pheromone treatment step is critical. Rodents communicate through chemical signals that persist in nesting areas and along travel routes long after animals are gone. A property that smells right to a rodent will be re-infested. Neutralizing pheromone trails requires enzyme-based treatments applied at the correct concentration and contact time, household cleaning products cannot achieve this.
Contaminated insulation removal requires professional equipment. Standard shop vacuums and household tools can spread contamination rather than contain it. HEPA-filtered equipment is the appropriate standard for this remediation, as referenced in EPA guidance on indoor air quality and rodent contamination.
The timeline depends entirely on infestation extent and affected areas. A single wall cavity with limited contamination can be addressed in a half-day. A full attic with extensive nesting and insulation damage is a multi-day project. An on-site inspection provides an accurate scope.
| Phase | What It Addresses | Why It Matters |
|---|---|---|
| Droppings and nesting removal | Physical contamination | Removes pathogen source material |
| HEPA vacuuming | Airborne particles and residue | Prevents respiratory exposure |
| Disinfection | Bacteria and viral pathogens | Reduces disease transmission risk |
| Pheromone treatment | Chemical attractant trails | Prevents re-infestation by new rodents |
| Insulation replacement | Structural and thermal performance | Restores energy efficiency and air quality |
| Entry point documentation | Structural vulnerabilities | Supports permanent exclusion |
The biggest mistake homeowners make after discovering an infestation is cleaning what they can see and assuming the job is done. The damage that matters most, contaminated insulation, compromised wiring, active pheromone trails, is almost always out of sight inside wall voids, attic spaces, and crawl spaces. A surface clean does not address any of it.
If you’ve attempted a DIY cleanup and odor persists, that’s a reliable signal that the contamination source was not fully removed. Persistent stale odors typically indicate residual urine saturation in insulation or structural materials requiring professional extraction and treatment.
Identifying and addressing rodent damage in walls is rarely straightforward, and incomplete responses compound over time. Rodent Cleanup Experts specializes in professional rodent infestation cleanup, odor removal, contaminated insulation removal, and pheromone treatment for homes and properties across Los Angeles, Ventura, San Bernardino, Riverside, and Orange Counties. Every cleanup begins with a thorough inspection, a clear scope of work, and a restoration plan built around your property’s actual condition. Contact Rodent Cleanup Experts to schedule an assessment and get the problem resolved properly.
Frequently Asked Questions
Q: What are the early warning signs of rodents in walls?
A: The earliest signs are usually sounds: scratching, scurrying, or gnawing coming from inside wall voids, especially at night when rodents are most active. Shortly after, you may notice fecal pellets along baseboards, grease smudges on drywall near gaps, or a stale, musky odor. Catching these signs of rodent damage in walls early gives you the best chance of limiting structural damage, insulation contamination, and potential wiring hazards before the infestation grows.
Q: Can rodents cause structural damage to wall studs and insulation?
A: Yes. Rodents gnaw continuously to wear down their teeth, and wall studs, ceiling joists, and drywall are all targets. Beyond the wood itself, they shred insulation to build nests inside wall cavities, reducing its thermal performance and contaminating it with droppings, urine, and pathogens. In severe infestations, insulation may need full removal and replacement. A structural vulnerability assessment by a qualified professional can reveal how far the damage has spread before you commit to repairs.
Q: How can I tell if rodent activity in my walls is causing electrical issues?
A: Rodents chew through wire insulation to access nesting material or simply because wiring runs through their travel routes inside wall voids. Warning signs include flickering lights, tripped breakers with no obvious cause, burning smells near outlets, or outlets that stop working. Rodent electrical wire damage in walls is a genuine fire hazard. If you notice any of these symptoms alongside other signs of infestation, have a licensed electrician inspect the wiring before attempting any cleanup or repairs.
Q: What should I do if I suspect rodent damage behind my drywall?
A: Start by documenting what you can see and hear: droppings, rub marks, odors, and the location of sounds. Avoid cutting into drywall yourself without proper PPE, since disturbing nesting materials can release hantavirus-carrying particles. Contact a professional rodent damage restoration service to inspect the wall cavities, assess insulation contamination, and develop a safe cleanup plan. Professionals use HEPA vacuuming, antimicrobial treatments, and pheromone neutralizers that standard household cleaning cannot replicate.
This article was written using GrandRanker