Table of Contents
- Signs of Rodent Damage in Insulation
- What You’ll Need for Safe Mouse Nest Removal
- Step 1: Remove Contaminated Materials and Mouse Nests from Insulation
- Step 2: The Best Way to Clean Rat Urine and Droppings
- Step 3: Sanitizing Attic After Rodent Infestation
- Replace vs. Reinstall: Choosing New Insulation
- Step 4: Rodent-Proofing and Preventing Future Infestations
- When to Call a Professional for Mouse Nest Removal
- Frequently Asked Questions
Last Updated: September 7, 2026
Removing a mouse nest from your insulation demands more than a dust mask and trash bag, because the real danger lies in the microscopic pathogens left behind in droppings and urine, so learning how to remove mouse nests from insulation safely is critical. This guide from Rodent cleanup experts walks you through the safe, step-by-step process to remove mouse nests from insulation, clean the contaminated area, and prevent rodents from returning.
Signs of Rodent Damage in Insulation
The most obvious sign of a rodent problem in your attic is finding nesting materials like shredded paper, fabric, or plant matter woven into your insulation. Look for dark, rice-shaped droppings scattered across the surface, grease marks along rafters and beams, and gnaw marks on wood or wiring.
A common mistake is assuming that if you can’t see a nest, there isn’t one. Mice often burrow deep within the insulation, creating hidden tunnels only discovered during a thorough inspection. A musty, ammonia-like odor in the attic is another telltale sign of urine saturation. If you notice any of these signs, the affected insulation is contaminated and needs careful handling.
What You’ll Need for Safe Mouse Nest Removal
Before you begin, gather the essential safety gear and supplies, as rodent droppings and urine can carry pathogens that become airborne when disturbed.
Step-by-Step PPE Protocol
Proper personal protective equipment (PPE) is your first line of defense against exposure to harmful bacteria and viruses.
- Respirator: Use a P100 or N100 respirator, not a standard dust mask. A dust mask will not filter out the tiny airborne particles that pose the greatest health risk.
- Gloves: Wear heavy-duty, disposable nitrile or rubber gloves. Do not use porous work gloves that can absorb contaminants.
- Protective Suit: Put on a disposable Tyvek suit or old clothing that you can discard or wash separately in hot water afterward.
- Eye Protection: Wear safety goggles to prevent any splashing or airborne debris from contacting your eyes.
Never use a standard household vacuum or leaf blower to clean up droppings or nest debris. The heat and motor can aerosolize dangerous particles, spreading contamination throughout your entire home. You must use a HEPA-filtered vacuum specifically designed for hazardous material cleanup.
Step 1: Remove Contaminated Materials and Mouse Nests from Insulation
The physical act of removing the nest and soiled insulation is where most people make their biggest mistakes. The goal is to remove the contaminated material with minimal disturbance to prevent aerosolizing pathogens like Hantavirus, which can be fatal.
Pre-Removal Preparation
Before you touch anything, you must prepare the area to contain the contamination.
- Isolate the Workspace: Close all interior doors and seal off HVAC vents in the attic with plastic sheeting and tape to prevent airborne particles from being pulled into your living space.
- Set Up a Decontamination Zone: Place a heavy-duty trash bag and a bucket of soapy water or disinfectant wipes just outside the attic access point for PPE removal.
- Dampen the Material: Using a garden sprayer, lightly mist the nest and surrounding contaminated insulation. Do not soak it, you want to weigh down dust, not create a slurry that can leak through your ceiling.
The Removal Technique
Now you can begin the careful work of extraction.
- Work in Small Sections: Do not pull up large swaths of insulation, as this causes tearing and debris. Work in small, manageable sections, gently lifting material from the floor.
- Use a Scooping Motion: A flat-bladed shovel or large plastic scoop is more effective than your hands. Use a scooping motion to lift material, minimizing the chance of it breaking apart.
- Double-Bag Everything: Place contaminated material directly into a heavy-duty contractor-grade trash bag (at least 3 mils thick). When two-thirds full, seal it, then place it inside a second clean bag and seal that one as well.
- Do Not Squeeze or Compact: Resist pushing down on the material to make room. Compressing it can force contaminated liquids out and aerosolize particles.
The Final Vacuum Pass
After the bulk of the material is removed, a layer of fine debris, droppings, and urine crystals will remain on the attic floor and rafters. This is where a HEPA vacuum is non-negotiable.
A standard shop vacuum or household vacuum is absolutely forbidden. These machines do not have HEPA filtration and will exhaust the microscopic, pathogen-laden particles directly into the air you are breathing. You must use a vacuum with a true HEPA filter, which is designed to trap 99.97% of particles at 0.3 microns.
- Vacuum All Surfaces: Systematically vacuum the entire contaminated area, including the subfloor, exposed rafters, and tops of joists. Pay special attention to corners and crevices where droppings accumulate.
- Dispose of the Vacuum Bag: Carefully remove the HEPA vacuum bag, seal it in a plastic bag, and dispose of it with your other contaminated waste. If your vacuum has a reusable canister, empty it into a bag and wipe the inside with a disinfectant.
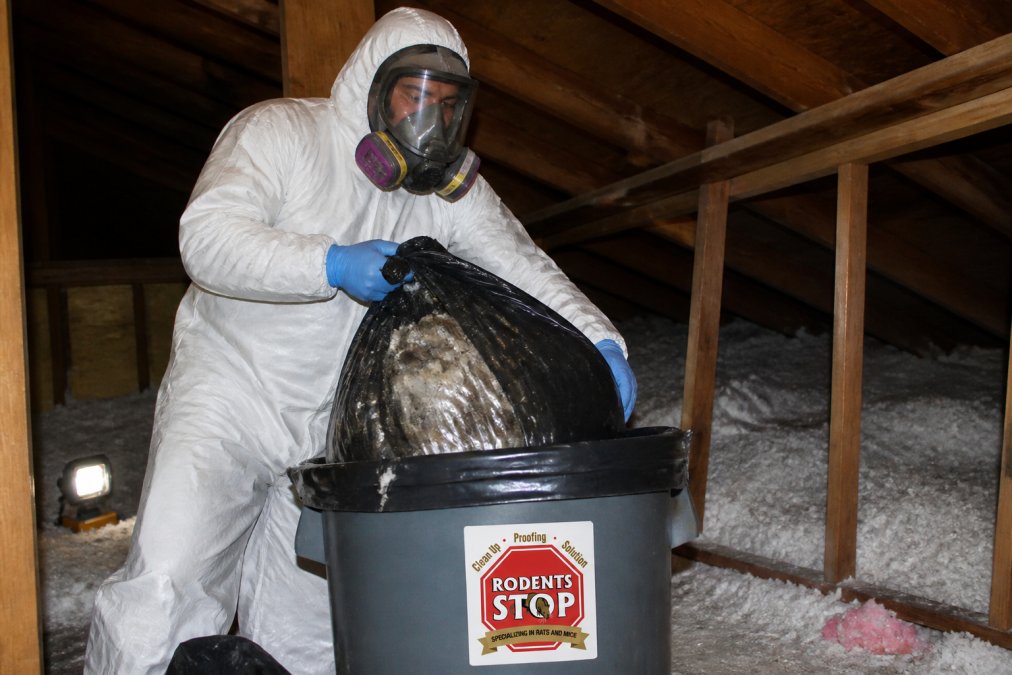
Disposal of Contaminated Waste
Check with your local waste management authority for rules on disposing of animal waste. In most areas, double-bagged waste can go in regular trash pickup, but some municipalities have specific biohazardous waste guidelines. Never leave bags on the curb overnight, as they can attract other animals.
Step 2: The Best Way to Clean Rat Urine and Droppings
After removing solid waste, the next challenge is addressing urine and lingering pathogens. The best way to clean rat urine and droppings is to thoroughly wash affected surfaces with an enzyme-based cleaner or commercial biocide designed to neutralize organic waste, eliminating odors at the source.
Apply the cleaner generously and allow it to sit for the time specified on the product label, usually 10 to 15 minutes. This dwell time is critical. After soaking, blot up excess liquid with paper towels and dispose of them in your waste bags. For porous surfaces like wood beams, you may need to repeat this process several times.
Step 3: Sanitizing Attic After Rodent Infestation
Once the area is clean of visible waste, sanitizing your attic after a rodent infestation requires a final disinfection pass to kill remaining bacteria and viruses. Using a sprayer, apply a registered disinfectant to all affected surfaces, including the attic floor, rafters, and nearby ductwork. Pay special attention to areas where you found nests.
After sanitizing, run a dehumidifier or ensure proper attic ventilation to dry the area completely. Rodents are attracted to moisture, and a damp environment will not only encourage their return but also promote mold growth on the wood surfaces you just cleaned.
The goal of this step is to restore the area to a safe, sanitary condition. This process eliminates the pheromones and odors that rodents use to navigate, preventing them from re-establishing their territory.
Replace vs. Reinstall: Choosing New Insulation
Deciding whether to remove and replace your insulation or attempt a spot repair is a critical decision. The wrong choice can leave lingering odors, hidden contamination, and an open invitation for rodents to return. The decision hinges on the material you have and the extent of the contamination.
The Material Matters: A Removal Guide
Not all insulation is created equal when it comes to contamination. Here’s a breakdown of how different materials respond to rodent activity:
- Fiberglass Batts and Rolls: This is the most common attic insulation. While non-organic and moisture-resistant, its tangled fibers easily trap droppings, urine, and nesting debris. Verdict: Remove and replace. Contaminants become physically lodged within the fiber matrix, making cleaning ineffective. Replacement is the only safe and practical option.
- Loose-Fill Cellulose: Made from recycled paper treated with fire retardants, cellulose is highly absorbent, soaking up urine and pathogens deep into its core. Verdict: Remove and replace. Once saturated, cellulose is permanently compromised and loses its insulating R-value when wet.
- Spray Polyurethane Foam (SPF): This is the outlier. Closed-cell spray foam is dense, non-porous, and does not absorb liquids. Verdict: Clean and sanitize in place. Remove the nest and clean the surface with an enzyme-based cleaner. The foam can typically be fully decontaminated, saving you significant expense. However, open-cell foam is more porous and may require professional assessment.
The Hidden Cost: Will Your Insurance Pay?
A question few guides address is whether homeowners insurance will cover replacing rodent-damaged insulation. The short answer is: usually not. Standard policies explicitly exclude damage caused by pests, rodents, and vermin, as infestations are considered a preventable maintenance issue.
However, there is a potential loophole. If rodents gained entry through a structural gap caused by a covered peril (like a fallen tree branch creating a roof hole), the resulting damage might be partially covered. This depends heavily on your specific policy and insurer. Before spending thousands on professional remediation, call your insurance agent to ask directly.
A Note on Vapor Barriers
If removing large sections of insulation, inspect the vapor barrier (the paper or plastic facing on the warm side). If torn, stained, or contaminated, it must be removed and replaced. A new vapor barrier prevents moisture from condensing in the attic, which can lead to mold and future pest problems.
If you have any doubt about the extent of contamination, especially if the insulation is cellulose or if the area is large, err on the side of removal. The cost of new insulation is a fraction of the potential health risks and the difficulty of dealing with a recurring infestation that is drawn to lingering pheromones in a poorly cleaned area.
Step 4: Rodent-Proofing and Preventing Future Infestations
Removing the nest is only half the battle. To prevent future infestation, identify and seal all potential entry points, a process known as rodent exclusion. Mice can squeeze through gaps as small as a dime, so a thorough exterior inspection is critical.
- Inspect the roofline, eaves, and soffits for gaps or holes.
- Check around utility lines, vents, and pipes that enter the home.
- Seal any openings with steel wool, expanding foam, or metal flashing, as rodents can easily gnaw through wood, plastic, and caulk.
- Trim tree branches that overhang the roof, as they provide easy access for rodents.
An exclusion system is only as good as its weakest point. After sealing all visible gaps, consider setting up traps in the attic for a few weeks to catch any stragglers that were trapped inside during your cleanup.
When to Call a Professional for Mouse Nest Removal
If the infestation is widespread, contamination is severe, or you are uncomfortable working with hazardous waste, it is time to call a professional. Attempting a large-scale cleanup without the right equipment can put your family’s health at risk.
Professional cleanup teams, like those at Rodent cleanup experts, have the experience to handle complex situations, including rodent infestation cleanup, removing large volumes of contaminated insulation, sanitizing HVAC systems, and performing odor removal that neutralizes pheromones. They also have industrial-grade equipment, such as commercial HEPA vacuums and professional-grade biocides, not available to consumers.
When you choose Rodent cleanup experts, you get a team that doesn’t just clean up what rodents left behind. We help address the source of the problem by identifying potential entry points so you can reduce the risk of rodents returning, restoring your attic to a clean, safe, and sanitary condition.
For many homeowners, the complexity of safe removal, sanitation, and odor control makes this a job best left to professionals. Rodent cleanup experts provides comprehensive rodent damage cleanup, sanitation, and restoration throughout Los Angeles, Ventura, San Bernardino, Riverside, and Orange Counties. Our team handles everything from contaminated insulation removal to thorough sanitization and odor treatment, including professional replacement of damaged insulation. Get started with Rodent cleanup experts and restore your attic to a clean, safe condition you can trust.
Frequently Asked Questions
Do I need to replace insulation after a mouse infestation?
In most cases, yes. If insulation is heavily contaminated with mouse droppings, urine, or nesting materials, it’s nearly impossible to clean it thoroughly enough to remove all health hazards. Porous materials like fiberglass and cellulose absorb urine and odors. Removing and replacing the affected insulation is the only way to ensure your attic is safe and odor-free.
Can I vacuum mouse nests out of my insulation?
No, you should never use a standard household vacuum to clean up mouse nests, droppings, or contaminated insulation. A regular vacuum will aerosolize dangerous particles, spreading bacteria and potential viruses like hantavirus into the air you breathe. Professional cleanup uses a HEPA-filtered vacuum, which is designed to trap these microscopic particles safely.
What are the health risks of cleaning rodent nests without proper gear?
Cleaning rodent waste without personal protective equipment (PPE) exposes you to a range of pathogens. Disturbing dried droppings and urine can release airborne particles that carry diseases like hantavirus and salmonella. Contact with contaminated materials can also lead to skin irritation or infection. Wearing an N-95 or P-100 respirator, gloves, and protective clothing is critical to prevent illness.
How long do mouse droppings remain toxic in an attic?
Mouse droppings and urine can remain hazardous for a long time, often months or even years, especially in a dry attic environment. The pathogens they contain do not disappear once the droppings dry out. In fact, dried droppings can crumble and become pulverized, releasing contaminated dust into the air. This is why professional sanitization is crucial for protecting your home’s air quality.