Table of Contents
- Understanding Rodent Activity: What You Need to Know
- Audible Signs: Noises That Indicate Rodent Presence
- How to Tell if Rodents Are in Walls
- Rodent Droppings in Attic: Identification and What They Mean
- Visible Damage: Rodent Damage to Electrical Wiring and Structures
- How to Get Rid of Rodents in Attic and Walls
- What to Do After Confirming Rodent Activity
- Frequently Asked Questions
Last Updated: October 14, 2026
Understanding Rodent Activity: What You Need to Know
Rodent infestations don’t always announce themselves loudly. At Rodent cleanup experts, we help homeowners identify rodent activity before it becomes a major problem.
Signs of rodent activity in attic and wall spaces vary by rodent type, how long they’ve been present, and how extensive the infestation is. Mice leave different evidence than rats, and fresh activity looks different from old damage.
This guide covers the most common indicators of rodent presence, from nighttime sounds to physical damage, plus how to inspect safely and what to do once rodents are confirmed.
Audible Signs: Noises That Indicate Rodent Presence
One of the first clues homeowners notice is sound. Rodents are most active at night, which is when you’re most likely to hear them.
Common noises include:
- Scratching and scurrying sounds in walls or attic spaces
- Squeaking or chirping, especially from young rodents
- Gnawing sounds as they chew through wood, wires, and insulation
- Dragging or rustling noises as they move nesting materials
Scratching in the attic often comes from rats running across beams or through insulation; wall scratching typically indicates mice behind drywall. The sound is loudest near entry points or nesting areas.
Not every noise means rodents, pipes, settling foundations, and wind can sound similar. But if the noise is consistent, mostly at night, and moves around, rodent activity is likely.
Hearing scratching above the ceiling?
If you suspect rats in the ceiling, note which room the sound comes from and when you hear it. During an assessment, we check the accessible attic above that room for droppings, gnaw marks and entry gaps. Call 833-END-RATS to have the source assessed.
How to Tell if Rodents Are in Walls
Walls are a favorite hiding spot for rodents, offering protection, darkness, stable temperatures, and easy access to kitchen or pantry food. But wall cavities also host other animals, and the evidence can look similar at a glance. Knowing how to read the signs, and inspect safely, separates a guess from a confirmed problem.
Signs of rodents in walls include:
- Scratching or gnawing sounds coming from inside the wall cavity
- Small holes or entry points near the wall base, around pipes, or where utilities enter the house
- Oily rub marks or smudges along the wall where rodents travel repeatedly
- A musty or musky odor coming from the wall
- Visible droppings near baseboards or in corners
- Grease trails or darkened paths along baseboards and framing
Distinguishing Rodents from Other Wall and Attic Wildlife
This step prevents misidentification.
- Squirrels are active during the day. You’ll hear heavy scampering, often starting before sunrise, plus a distinct chattering or scolding call. Their droppings resemble rat droppings but are more often found in loose piles near a nest site rather than scattered along travel routes. Squirrels also gnaw entry holes that are noticeably larger and rounder than rodent holes.
- Bats are nocturnal but produce almost no scratching or scurrying noise. Instead, you’ll hear faint rustling or squeaking concentrated at dusk and dawn near a roost point. Bat droppings (guano) pile up directly below the roost and crumble easily into a fine, shiny powder when crushed, rodent droppings do not. A strong ammonia odor concentrated in one spot is another bat signal.
- Raccoons or opossums produce heavy thumping, vocalizations, and large droppings. Their entry points are typically much larger, often at roof edges or soffits, and they may tear at materials rather than gnaw them.
- Birds nesting in vents or soffits leave droppings with visible white caps and nesting material that includes twigs, grass, and feathers rather than shredded insulation or fabric.
How to Inspect Walls Safely
Wall cavities and attics are not benign spaces. Understand the hazards first:
- Contaminated dust. Rodent droppings and urine dry out and become airborne when disturbed. Never sweep, vacuum with a standard vacuum, or blow air into a wall cavity. Disturbing dried droppings can release particles that carry bacteria and allergens.
- Unstable insulation. Loose-fill and batt insulation can hide voids, and stepping or reaching into it in an attic can lead to a fall through a ceiling. Stay on joists or walking boards.
- Electrical hazards. Chewed wiring may still be live. Do not touch exposed conductors, and do not probe wall cavities with metal tools.
- Direct contact. Rodents can bite when cornered, and nests may contain parasites. Wear gloves and a fitted respirator if you must be near evidence.
A practical inspection sequence:
- Start in the room where you’ve heard activity. Listen at the wall before touching anything.
- Check the exterior for entry points, gaps around utility penetrations, dryer vents, hose bibs, and the sill plate.
- Check interior baseboards and corners for droppings, rub marks, and staining.
- Note the location and quantity of evidence rather than cleaning it up. Photographs help a professional assess freshness and activity level.
If you suspect rodent activity in walls, avoid poking into wall cavities, you risk exposing yourself to contaminated materials or disturbing a nest. Professional inspection is safer and more thorough.
The smell is often a strong clue. Rodent urine has a distinctive ammonia-like odor that strengthens as the infestation grows. If you notice it near a wall, rodent activity is likely present.
Never use a shop vac, leaf blower, or broom to clear droppings or nesting material. These actions aerosolize contaminated dust and spread it through the home.
Rodent Droppings in Attic: Identification and What They Mean
Droppings are one of the clearest signs of rodent activity. They’re also one of the most important to handle carefully.
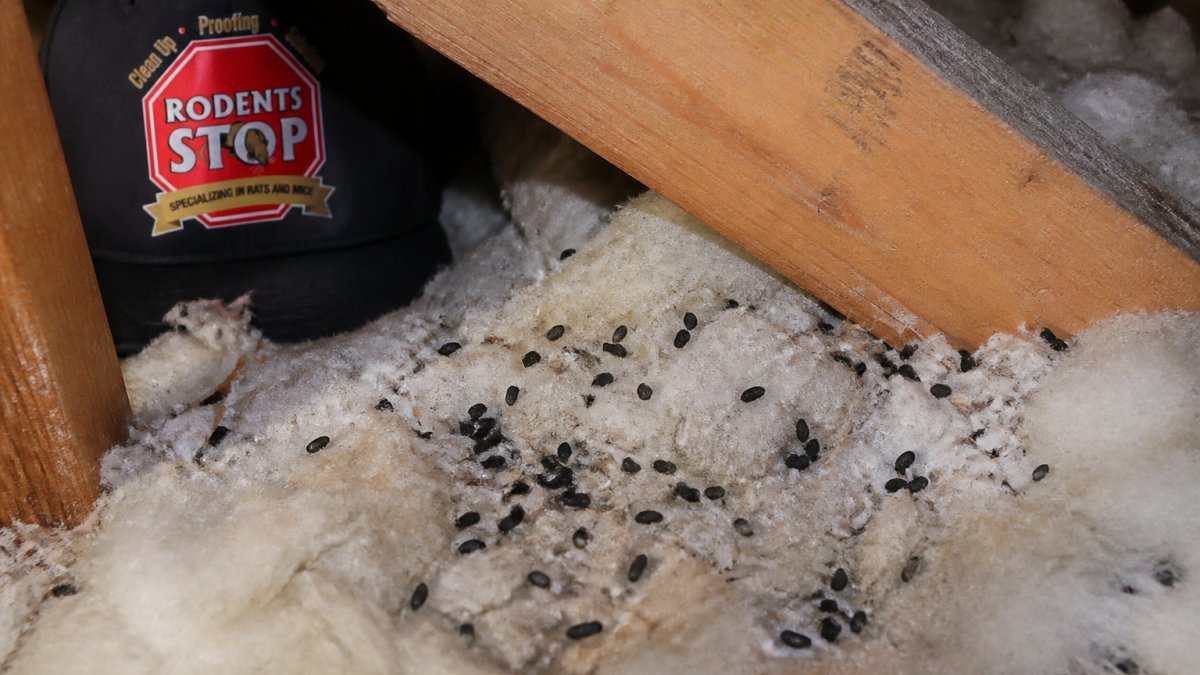
Mouse droppings are small, about the size of a grain of rice, dark, pointed at the ends, and often found in clusters.
Rat droppings are larger, roughly the size of a raisin or small bean, darker, with blunt ends.
Fresh droppings look dark and moist; old droppings are dry and crumbly.
Droppings in the attic are especially concerning. They contaminate insulation, reducing its effectiveness and creating a health hazard, rodent feces carry bacteria and allergens that affect respiratory health, particularly in children and people with asthma.
Never vacuum or sweep rodent droppings with a regular vacuum; this spreads particles into the air.
Visible Damage: Rodent Damage to Electrical Wiring and Structures
Rodents cause damage far beyond what they eat. Their gnawing instinct is constant, and they’ll chew through almost anything.
Common damage includes:
- Chewed electrical wiring (fire hazard)
- Gnawed wood beams, joists, and framing
- Damaged insulation with holes and torn sections
- Chewed PVC pipes and water lines
- Holes in stored items, boxes, and containers
- Damaged HVAC ducts and vents
Electrical damage is the most dangerous. Exposed wires create fire risk, especially in attics where materials are flammable.
Structural damage accumulates over time.
Insulation damage reduces energy efficiency. Rodents nest in insulation, compressing it and reducing its R-value, which leads to higher heating and cooling costs.
Rodent damage to pipes can cause leaks.
How to Get Rid of Rodents in Attic and Walls
Once you’ve confirmed rodent activity, removal is the next step. This involves trapping, exclusion, and prevention.
Trapping removes active rodents. Snap and electronic traps are often used.
Exclusion seals entry points so new rodents can’t get in. Common entry points include:
- Gaps around pipes and utilities
- Cracks in foundation or exterior walls
- Holes in roof vents or soffits
- Gaps under doors or around windows
- Openings where cables or wires enter
Seal holes with steel wool, caulk, or hardware cloth. Rodents can chew through many materials, but they struggle with metal barriers.
Sanitation removes food sources and nesting materials. Store food in sealed containers, clean up crumbs promptly, and remove clutter where rodents hide.
For extensive infestations or if you’re uncomfortable handling traps, professional pest control is an option.
What to Do After Confirming Rodent Activity
Confirming rodent activity is stressful, but it’s the first step toward solving the problem. What you do in the next 24 to 72 hours matters: preserve useful evidence, avoid spreading contamination, and set up a response that ends the infestation.
Step 1: Interpret What You Found Before You Clean It Up
Don’t rush to remove droppings or damaged material. The evidence itself tells you how serious the problem is.
- Freshness. Fresh droppings are dark and soft; old droppings are dry and crumbly. Finding both means activity has been ongoing for weeks or months, not days.
- Quantity and spread. A few droppings in one corner suggests a recent or limited entry. Droppings scattered across multiple rooms, along baseboards, and inside cabinets suggest established travel routes and a larger population.
- Location. Droppings concentrated near a wall or attic entry point point to an active access route. Droppings inside stored boxes or on shelves indicate rodents are moving through living space, not just passing through.
- Damage pattern. Chewed wiring, gnawed framing, and torn insulation near a nest site indicate a longer residency than isolated chew marks near an entry hole.
Step 2: Document, Don’t Disturb
Photograph droppings, rub marks, chewed materials, and entry points before anything is moved. Note the date, time, and location of each observation. This record helps a professional confirm activity, identify likely species, and prioritize inspection areas, and gives you a baseline to compare against after treatment.
Step 3: Limit Access and Reduce Attractants
While you wait for inspection or treatment:
- Keep pets and children away from areas with droppings or nesting material.
- Store food in sealed containers and clean up crumbs and spills promptly.
- Remove clutter that gives rodents cover, stacked boxes, paper, fabric, and stored pet food are common harborage.
- Trim vegetation away from the exterior walls and roofline.
Step 4: Avoid Unsafe Cleanup
This is the step most homeowners get wrong. Standard vacuums, brooms, and bleach sprays do not make rodent-contaminated areas safe.
- A standard vacuum exhausts fine particles back into the room.
- Bleach and household disinfectants may kill surface bacteria but do not remove embedded urine, allergens, or soaked insulation.
- Rodent urine penetrates deep into insulation, drywall paper, and wood framing. Surface cleaning leaves the source of odors and allergens behind.
Proper remediation uses HEPA filtration, sealed containment, appropriate personal protective equipment, and, when contamination is significant, removal and replacement of affected insulation and porous materials. Rodent infestation cleanup after confirmed activity is worth the investment, as DIY cleanup with a regular vacuum and bleach doesn’t remove all contamination.
Step 5: Arrange Inspection and Treatment
Once evidence is documented, arrange a professional inspection that identifies all entry points, confirms contamination extent, and builds a treatment plan. Trapping removes active rodents; exclusion seals the structure; sanitation and material replacement remove the contamination left behind.
Step 6: Monitor After Treatment
Activity can return if an entry point was missed or a new one opens. For several weeks after treatment, check the locations you documented earlier, baseboards, attic framing, wall voids near utility penetrations. New droppings, fresh rub marks, or renewed scratching mean the exclusion work needs another look.
The sequence matters: interpret, document, limit access, avoid unsafe cleanup, then treat and monitor. Cleaning before documenting destroys the evidence you need to solve the problem correctly.
Frequently Asked Questions
How can you tell if rodents are currently active in your attic or walls?
Current rodent activity shows fresh droppings that are dark and moist, active nesting materials that appear recently disturbed, and sounds occurring regularly at night. Look for oily rub marks along walls where rodents travel frequently, and check for fresh gnaw marks on wood and insulation. If you notice musty or musky odors that have developed recently, or see pest activity in multiple locations, rodents are likely present now. Professional inspection can confirm activity level and identify entry points.
What do rodent droppings in an attic look like and why is identification important?
Rodent droppings are small, dark pellets roughly the size of a grain of rice for mice or larger for rats. Fresh droppings appear moist and dark; older ones are dry and gray. Identifying droppings confirms infestation and helps determine rodent type and activity timeline. Droppings contaminate insulation and pose health risks through bacteria and allergens. Professional cleanup removes contaminated materials and sanitizes affected areas to eliminate health hazards and odors.
Can rodents in walls damage electrical wiring, and what are the risks?
Yes, rodents gnaw on electrical wiring to access the copper inside and to keep their teeth sharp. Damaged wiring creates fire hazards, electrical shorts, and potential shocks. Rodent damage to HVAC components, pipes, and structural wood also occurs. These hazards require immediate attention and professional assessment. After rodent removal, a licensed electrician should inspect wiring, and professionals should address all gnawed materials and structural damage to restore safety.
How do you get rid of rodents in attic and walls, and when should you call a professional?
Removal requires sealing entry points, trapping or baiting rodents, and removing nesting materials and contaminated insulation. Professional pest control handles trapping and exclusion; professional cleanup specialists remove droppings, contaminated insulation, and odors using HEPA equipment and sanitization. Attempting cleanup with standard vacuums spreads contamination and health risks. Professionals identify entry points, ensure complete removal, and restore the space safely, addressing both the infestation and the damage it caused.