Table of Contents
- Why Rodent-Damaged HVAC Vents Need Immediate Attention
- Signs of Rodent Damage in Walls and Ductwork
- What You’ll Need Before Starting
- Step-by-Step: Cleaning Rodent-Damaged HVAC Vents
- How to Disinfect Air Ducts After Mice Infestation
- Rodent Proofing HVAC Systems to Prevent Return
- When to Call a Professional
- Common Mistakes to Avoid
- Frequently Asked Questions
Last Updated: September 1, 2026
Why Rodent-Damaged HVAC Vents Need Immediate Attention
Rodent-damaged HVAC vents pose serious health risks that extend far beyond visible droppings and nesting materials. When rodents contaminate your ventilation system, they leave behind pathogens, allergens, and fecal matter that circulate throughout your home every time your HVAC system runs. This isn’t a cosmetic problem, it’s a respiratory and sanitation issue that demands swift action.
The longer contaminated ductwork remains untreated, the more particles spread through your supply vents and return vents. Rodent droppings contain hantavirus and other harmful bacteria that become airborne when disturbed. Nesting materials break down into dust that your furnace pulls into the system and distributes to every room. The smell intensifies as decomposing organic matter accumulates inside flexible ducting and hard duct sections.
Disturbing rodent droppings with improper equipment can aerosolize pathogens. If you attempt this yourself, use a HEPA vacuum with proper respiratory protection, never use a standard household vacuum, which spreads contamination further.
Signs of Rodent Damage in Walls and Ductwork
Identifying rodent damage in your HVAC system early prevents the contamination from spreading deeper into your home. The signs are often subtle at first, then unmistakable once infestation progresses.
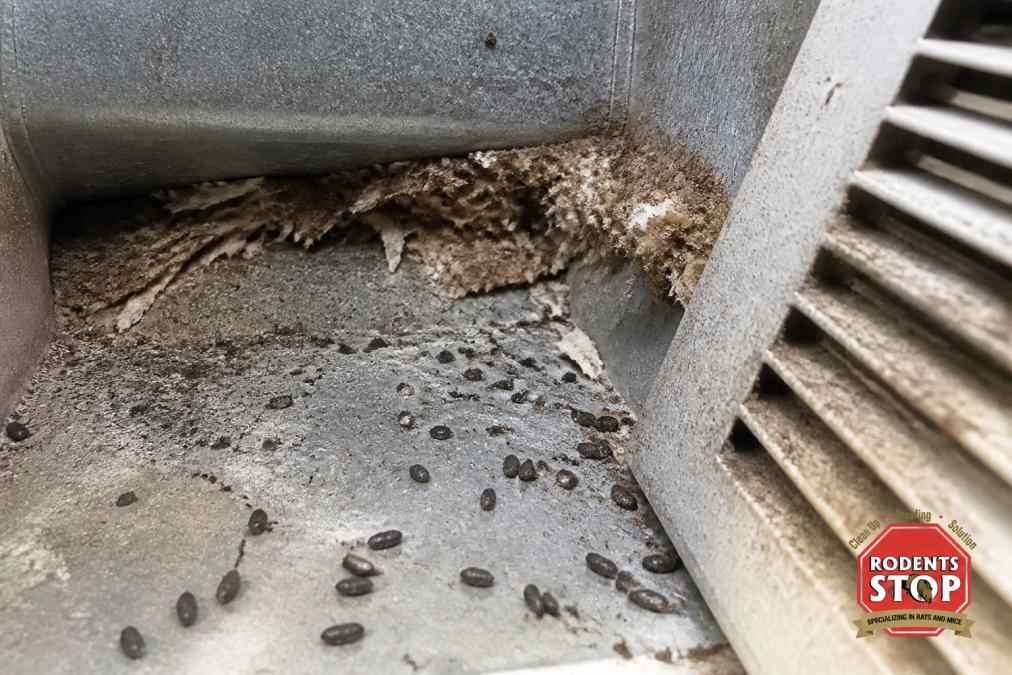
Visible droppings inside vents and ducts are the most obvious indicator. Rodent droppings are small, dark, and pellet-shaped. If you see them accumulating near vent openings or inside accessible ductwork, infestation is active or recent. Fresh droppings appear moist; older ones are dry and crumbly.
Nesting materials appear as shredded insulation, fabric, paper, and plant matter packed into duct sections or around vent covers. Rodents build nests inside ducts because the space is dark, protected, and warm from air circulation.
Rancid odors coming from your vents signal decomposing organic matter, dead rodents, urine, or fecal buildup inside the ductwork. This smell intensifies when your furnace runs and pushes air through contaminated sections.
Scraping sounds inside walls or ducts during HVAC operation indicate active rodent activity. Mice and rats move through ductwork, especially at night.
Damaged insulation on flexible ducting shows bite marks and torn sections. Rodents chew through duct insulation to access the interior and create nesting spaces.
Visible entry points around duct connections, where flexible ducting meets hard duct, or near furnace access points indicate how rodents entered your HVAC system. These gaps also allow air leakage and further contamination.
Check your return vents, the large intake vents where air gets pulled back into your furnace. Rodents often enter through these openings because they lead directly into the ductwork. Installing vent covers with proper mesh size prevents future entry.
What You’ll Need Before Starting
Proper equipment makes the difference between effective cleaning and spreading contamination further. Attempting this work without the right tools puts your health at risk and may damage your HVAC system.
Essential safety equipment:
- N95 or P100 respirator mask (not a cloth mask)
- Nitrile gloves (double-layered for protection)
- Eye protection or safety glasses
- Disposable coveralls or clothing you can wash separately
- Shoe covers or boots you’ll remove before leaving the work area
Cleaning and disinfection supplies:
- HEPA-filter vacuum (essential, standard vacuums spread particles)
- Stiff-bristled brush for scraping droppings and debris
- Spray disinfectant rated for killing pathogens (bleach solution or commercial disinfectant)
- Damp cloths or disposable wipes
- Plastic bags for contaminated materials
- Duct tape or foil tape for sealing gaps
Inspection and access tools:
- Flashlight or headlamp for seeing inside ducts
- Screwdriver set (Phillips and flathead)
- Adjustable wrench for duct connections
- Dryer vent brush or flexible duct brush for reaching deeper sections
- Stepladder for accessing ceiling vents
Optional but helpful:
- Shop towels or disposable rags
- Hand sanitizer
- Trash bags for debris
- Notebook to document damage locations
Before you begin, turn off your HVAC system completely. You don’t want air circulation spreading particles while you work.
Step-by-Step: Cleaning Rodent-Damaged HVAC Vents
This process requires patience and attention to detail. Rushing through cleaning leaves contamination behind, defeating the entire purpose.
Step 1: Turn Off Your HVAC System and Inspect
Shut down your furnace and air conditioning at the thermostat and at the main breaker if possible. This prevents air circulation from spreading rodent droppings and pathogens while you work. Open windows to create cross-ventilation in your home.
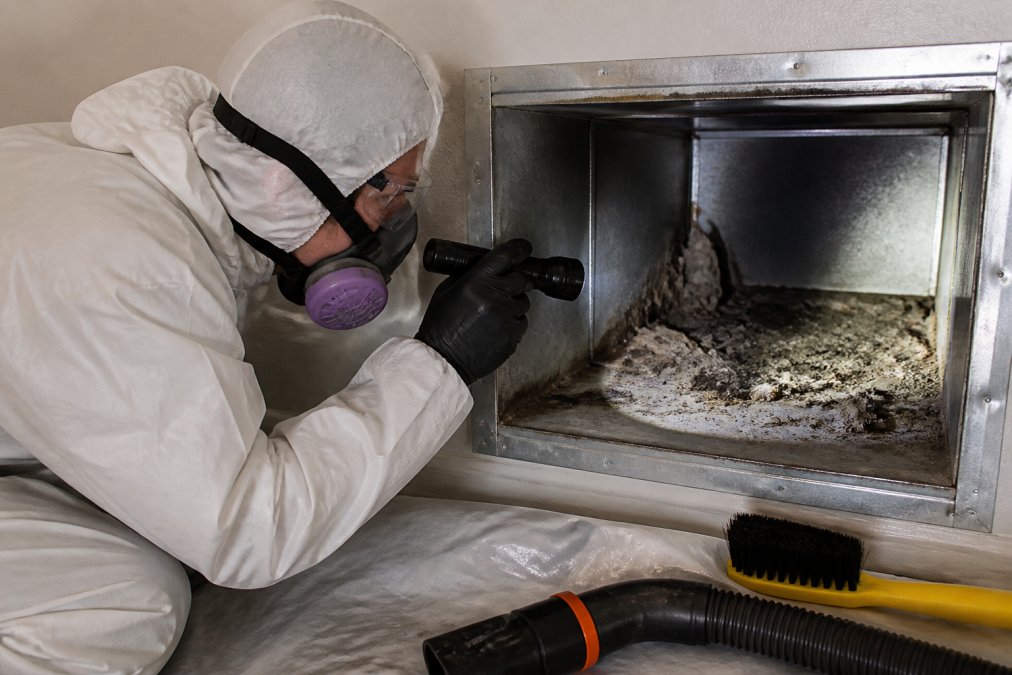
Put on your complete protective gear before touching anything. Respirator first, then gloves, then coveralls. Don’t skip any step, rodent droppings contain serious pathogens.
Use your flashlight to inspect accessible ductwork. Look for the extent of contamination: droppings, nesting material, insulation damage, and entry points. Document what you find with photos or notes. This helps you understand whether DIY cleaning is realistic or whether you need professional help.
Check your return air vents, supply vents, and any flexible ducting you can access. Trace the ductwork from your furnace to identify contaminated sections. Some damage may be hidden inside walls, which limits what you can clean yourself.
Step 2: Remove Accessible Rodent Droppings and Nesting Materials
Start with the most accessible areas. Use a damp cloth or disposable wipe to carefully pick up droppings, never sweep or use dry methods, which aerosolize particles. Dampen the cloth with disinfectant spray before wiping.
Place all contaminated materials into a sealed plastic bag. Do not reuse this bag. Dispose of it in your regular trash (sealed inside another bag if possible).
Remove nesting materials carefully. Use your stiff brush to loosen packed insulation and debris from duct surfaces. Wipe away loosened material with damp cloths. This step takes time, don’t rush.
For flexible ducting with heavy contamination, you may need to replace sections rather than clean them. Damaged insulation on flexible ducts cannot be fully restored. If the duct is severely compromised, note it for replacement.
Step 3: Vacuum with HEPA Filtration
This is where a HEPA vacuum becomes essential. Standard household vacuums lack the filtration to capture fine particles and actually spread contamination. A HEPA filter traps particles 0.3 microns and larger, small enough to catch rodent droppings and pathogens.
Vacuum all accessible duct surfaces, vents, and surrounding areas. Work methodically from one end of the ductwork to the other. Pay special attention to corners, seams, and areas where debris collects.
Empty the HEPA vacuum into a sealed plastic bag outside your home. Do not empty it indoors. If your vacuum has a disposable filter, seal the used filter in a bag before disposal.
Vacuum the area surrounding your HVAC system, including the furnace housing and any accumulated dust. Rodent contamination spreads beyond the ducts themselves.
How to Disinfect Air Ducts After Mice Infestation
Cleaning removes visible contamination. Disinfection kills pathogens left behind. Both steps are necessary for safe air quality.
After vacuuming, spray all accessible duct surfaces with a disinfectant rated for killing bacteria and viruses. Bleach solution (1 part bleach to 10 parts water) works, or use a commercial HVAC-safe disinfectant. Spray thoroughly, allowing the solution to contact all surfaces.
Let the disinfectant sit for the time recommended on the product label, typically 10-15 minutes. This contact time kills pathogens.
Wipe down sprayed surfaces with damp cloths to remove excess moisture. Moisture left inside ducts promotes mold growth, creating a new problem.
For return vents and supply vents, spray the interior surfaces and vent louvers. These areas accumulate the most dust and debris during normal operation.
Allow everything to dry completely before turning your HVAC system back on. Open windows and use fans to speed drying if needed. Running your system through damp ducts can spread moisture and create mold conditions.
Disinfection is not optional after rodent infestation. Pathogens survive for weeks in [rodent droppings](/dangers-of-rat-droppings-in-attic-health-risks-cleanup/). Proper disinfection kills these hazards and restores safe air quality.
Rodent Proofing HVAC Systems to Prevent Return
Cleaning is only half the solution. If you don’t seal entry points, rodents return and contaminate your system again.
Inspect where flexible ducting connects to hard ductwork. These joints are common entry points. Use foil tape or duct mastic to seal gaps. Foil tape is easier for DIY application; duct mastic (a sealant compound) creates a more permanent seal.
Check where ducts pass through walls or ceilings. Gaps around these penetrations let rodents access ductwork from inside walls. Seal with caulk or expanding foam, then cover with foil tape.
Install vent covers on return air vents with 1/4-inch mesh screening. This prevents rodents from entering while allowing adequate airflow. Ensure the cover fits snugly and doesn’t restrict air intake.
Examine your furnace housing and where ducts connect to the unit. Any gap larger than 1/4 inch is a potential entry point. Seal these with foil tape or mastic.
Check dryer vents and any other exhaust vents connected to your HVAC system. These often lack proper covers and invite rodent entry. Install covers with flapper dampers that close when not in use.
Seal holes in walls where utilities (electrical, plumbing) pass through. Rodents use these as highways to reach ductwork.
Look for damage to existing ductwork insulation. Torn or missing insulation makes it easier for rodents to chew through ducts. While replacing insulation is a bigger project, identifying damaged sections helps you prioritize repairs.
When to Call a Professional
Some rodent damage exceeds safe DIY scope. Recognizing these limits protects your health and ensures thorough restoration.
Call a professional if:
You cannot locate the extent of contamination. If rodents accessed ductwork through walls or attic spaces you can’t see, hidden contamination remains. Professional duct inspection with camera equipment reveals damage you can’t spot yourself.
Contamination extends deep into inaccessible ductwork. Professional equipment reaches sections standard tools cannot. Incomplete cleaning leaves pathogens circulating through your home.
You find dead rodents inside ducts. Decomposing rodent bodies create intense odor and accelerate bacterial growth. Professional teams have equipment and protocols for safe removal.
Your flexible ducting is severely damaged or collapsed. Replacing ductwork requires disconnecting and rerouting sections, work that demands HVAC expertise.
You’re uncomfortable working at heights or in confined spaces. Attic ductwork and ceiling vents require climbing and crawling. Falls and injuries aren’t worth the risk.
You have respiratory conditions, immune system issues, or live with vulnerable people. Professional crews have protective equipment and experience handling biohazards safely. Your health comes first.
The smell persists after cleaning. Odor suggests deeper contamination or dead rodent remains. Professionals use specialized equipment to locate and eliminate odor sources.
Rodent infestation cleanup specializes in comprehensive duct cleaning and sanitization after rodent infestation. Our team uses professional-grade HEPA equipment, disinfection protocols, and inspection cameras to ensure complete restoration. We identify entry points, seal them properly, and verify that your air quality is restored before we finish. If your cleaning attempts haven’t solved the problem, professional assessment often reveals what DIY efforts missed.
Common Mistakes to Avoid
Learning from others’ errors saves time, money, and health risks.
Using a standard household vacuum spreads contamination rather than containing it. Standard vacuums lack HEPA filtration and actually aerosolize fine particles. The vacuum motor can also be damaged by rodent droppings. Always use a HEPA-filter vacuum for this work.
Skipping respiratory protection exposes you to hantavirus and other pathogens. An N95 mask is the bare minimum; a P100 respirator is better. Cloth masks and surgical masks don’t provide adequate protection against fine particles.
Ignoring entry points guarantees rodent return. You can clean perfectly, but if gaps remain unsealed, new rodents enter within weeks. Sealing entry points is as important as cleaning.
Attempting to clean inaccessible ducts yourself leaves contamination behind. If you can’t reach it safely with your tools, a professional should handle it. Incomplete cleaning defeats the purpose.
Rushing the disinfection step leaves pathogens alive. Allow proper contact time for disinfectant to kill microorganisms. Spraying quickly and wiping immediately is ineffective.
Running your HVAC system while ducts are damp promotes mold growth. Moisture trapped in ducts creates ideal conditions for mold colonization. Let everything dry completely first.
Assuming one cleaning is enough if contamination was severe. Heavy infestations may require multiple cleaning passes to fully restore air quality. Document your work and reassess after a week.
Not wearing protective gear during disposal of contaminated materials. Rodent droppings remain hazardous even after removal. Wear gloves and mask when bagging and disposing of materials.
Rodent-damaged HVAC vents require immediate attention to protect your home’s air quality and your family’s health. The cleaning process is straightforward if contamination is limited to accessible areas, but severe infestations often hide damage you can’t see or safely reach. Professional rodent infestation cleanup provides comprehensive inspection, cleaning, disinfection, and sealing services to ensure your HVAC system is fully restored and protected against future rodent entry. Contact us for an inspection if cleaning attempts haven’t resolved the problem or if you’re uncertain about the extent of contamination in your ductwork.
Frequently Asked Questions
Q: Is mouse poop in HVAC ducts a health hazard?
A: Yes. Rodent droppings contain pathogens, bacteria, and allergens that become airborne when your HVAC system runs. Exposure can cause respiratory infections, allergic reactions, and hantavirus in rare cases. This is why cleaning rodent-damaged HVAC vents and sanitizing ductwork is essential for your family’s health. Professional HEPA vacuuming and disinfection remove these contaminants effectively.
Q: How do I know if rodents have nested in my air vents?
A: Look for these signs: rancid odors from supply or return vents, visible droppings around vent openings, nesting material (shredded insulation, fabric) inside ducts, scratching or squeaking sounds in ductwork, and mold growth near vents. You may also notice increased dust or allergens when the system runs. A furnace inspection or visual check of accessible ductwork can confirm contamination.
Q: Can rodent-damaged HVAC ducts be repaired or must they be replaced?
A: It depends on the extent of damage. Minor contamination can be cleaned and the ducts sealed with foil tape. Flexible ducting with significant insulation damage may need replacement. Rigid ducts are often repairable. A professional inspection determines whether ductwork repair or replacement is necessary. Damaged insulation should always be removed and replaced to restore your system’s efficiency and safety.
Q: What’s the difference between DIY cleaning and professional sanitization?
A: DIY cleaning removes visible droppings and nesting materials but often misses pathogens embedded in insulation and ductwork. Professional teams use HEPA vacuums, EPA-approved disinfectants, and mechanical cleaning to eliminate bacteria and allergens. They also identify entry points and apply rodent proofing measures. If you’ve already attempted DIY cleanup, professional sanitization ensures contamination is fully removed and prevents health risks.
This article was written using GrandRanker